The image tool
Out of the box, the editor provides a tool for uploading, rotating, and cropping images. To see a preview, open the index.html file in the /sandbox folder of the repo in a browser. Whilst in editing mode select a paragraph of text and click the image tool in the toolbox. Once the Image dialog opens, upload an image from your computer (it doesn't matter what you select as the process is faked).
Once your image finishes fake-uploading, the dialog will change to something like the image below with options to rotate and crop:
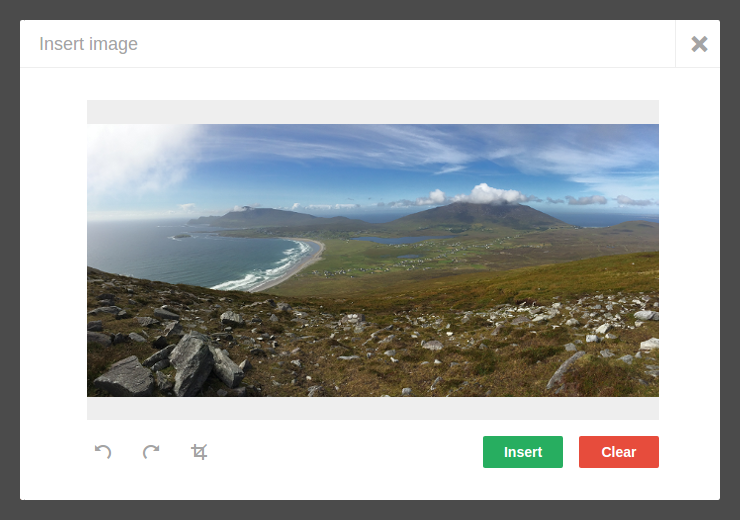
(Image courtesy of Guillaume Piot)
After an image has been inserted into the page it can be resized by clicking in any corner and dragging.
This might sound like a cop-out, but one option to consider is simply not supporting image uploads. If you're implementing a small hands-on site and you're saving content in HTML or template files (see the Saving strategies tutorial) then you might opt for the DIY approach. For this site I use Gimp to create my images and then manually add them into the relevant template with an <img> tag. I can still reposition/align my images within the content - and I saved myself all of the work that's ahead of us.
This definitely is a cop-out - I won't be presenting any server-side code in this tutorial and the implementation is left to you, however I will be laying out the requirements for server-side code as well as discussing and recommending approaches.
Batteries not included
To make the image tool work we need to add both server-side code to store the image and perform any editing operations, and client-side code to interface between the browser and the server. The following diagram outlines the process for uploading images:
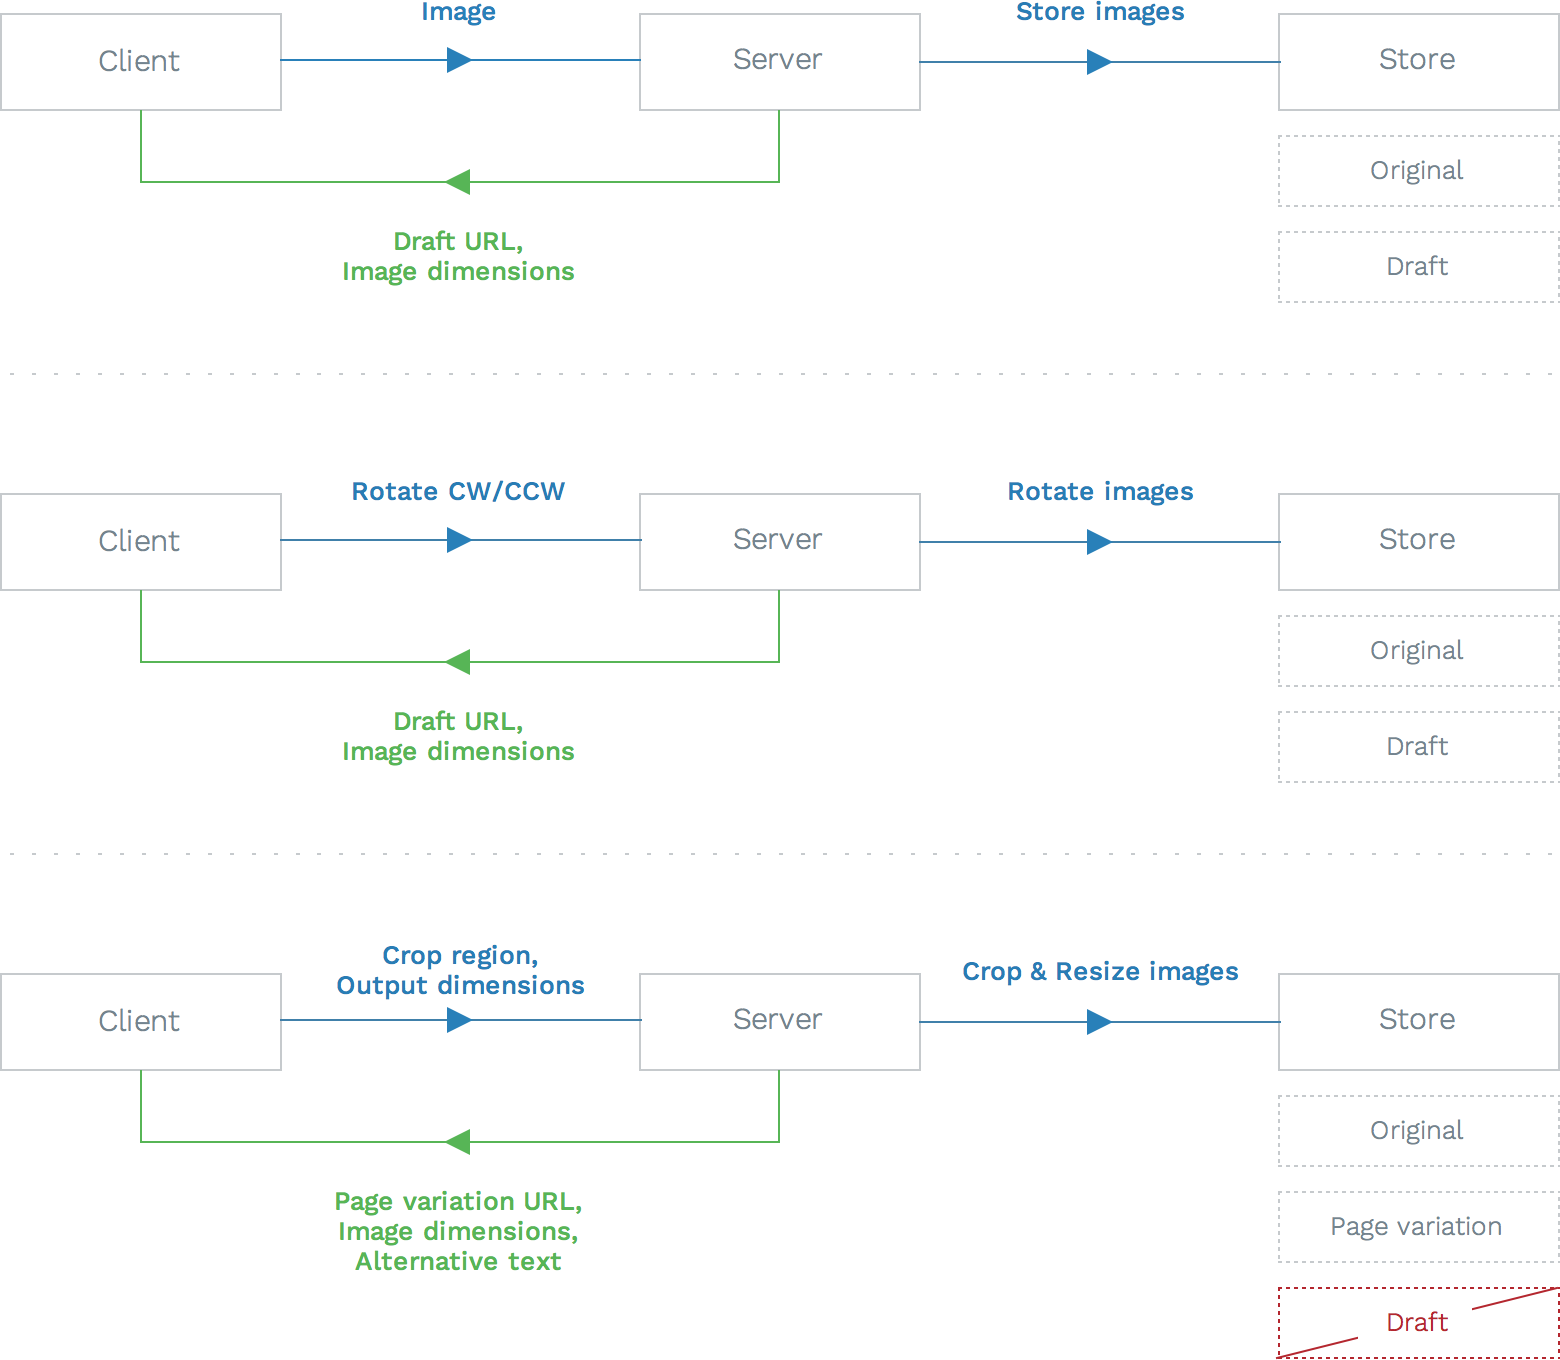
- Step 1 The image is uploaded to the server using AJAX, the server stores a copy of the original image plus a draft. The draft image URL and the dimensions of the original image are returned to the client. The draft variation of the image will be displayed to the user as a preview of the image to be inserted, it should be scaled to fit the dialog's display and compressed (e.g JPEG at 50% quality).
- Step 2 If the user chooses to rotate the image clockwise (CW) or counter-clockwise (CCW) the client will send a rotate request to the server with the direction of rotation. All rotate operations rotate the image 90°. The server rotates both the original and the draft image and again returns the URL of the draft with the original image's dimensions (e.g width x height is transformed to height x width).
- Step 3 When the user selects to insert the image a request will be sent to the server with the size of the image to be inserted and a crop region if the user has marked one. The original image should be cropped (if applicable) but not resized. A new variation of the image is created for the page, from the original image, at the size requested. The URL for the page variation is returned along with its dimensions (unlike the previous steps we do not return the size of the original image). I also recommend returning an alternative text value for the image based on its filename.
Return a different URL after each operation. Browser's cache images and the image will not update if the URL remains the same. A simple technique if you want to retain the existing URL is to simply append a random parameter and value (e.g /path/to/draft/image.jpg?_ignore=83273), this can be achieved server-side or client-side.
Communicating with the ImageDialog events
The browser needs to be able to relay the user's actions in the image dialog to the server and translate any responses into updates to the dialog and finally the page. This task client-side is managed by a function or class that we term the image uploader.
In reality our image uploader is a function that receives an instance of the ImageDialog each time it is created (e.g when the user clicks the image tool), and binds functions to handle each of the events which the dialog can trigger. The following events are triggered by the image dialog:
imageuploader.cancelupload
Triggered when the user decides to cancel uploading an image part-way through the upload.
imageuploader.clear
Triggered when the user clears the current image from the dialog.
imageuploader.fileready
Triggered when the user selects a file to upload. This event is triggered with the selected file as the first argument.
imageuploader.rotateccw
Triggered when the user requests the image is rotated counter-clockwise.
imageuploader.rotatecw
Triggered when the user requests the image is rotated clockwise.
imageuploader.save
Triggered when the user selects to insert the image.
imageuploader.unmount
Triggered when the dialog is closed.
cancel
Triggered when the dialog is cancelled by the user either by selecting the close button or pressing escape.
This event is not namespaced and is a standard dialog event, I've included it as it can be used to remove an uploaded image if the user cancels the dialog.
A blueprint for image uploaders
The following code is a functional blueprint for writing an image uploader, that is it would work provided the server-side code was also in place (and you're using a modern browser):
function imageUploader(dialog) {
     var image, xhr, xhrComplete, xhrProgress;

    // Set up the event handlers
    ... event handlers go here ...
}
We're going to cover event handlers separately; each handler would be defined inside the imageUploader function as indicated.
When the user cancels their upload we abort the upload and set the dialog to an empty state (the other dialog states are populated and uploading).
    dialog.addEventListener('imageuploader.cancelupload', function () {
        // Cancel the current upload

        // Stop the upload
        if (xhr) {
            xhr.upload.removeEventListener('progress', xhrProgress);
            xhr.removeEventListener('readystatechange', xhrComplete);
            xhr.abort();
        }

        // Set the dialog to empty
        dialog.state('empty');
    });
If the user clears the current image then we clear the dialog along with any existing image data. You might also choose at this point to call the server and request that the image is removed (see Temporary images).
    dialog.addEventListener('imageuploader.clear', function () {
        // Clear the current image
        dialog.clear();
        image = null;
    });
When the user clicks the upload button and selects a file, we need to upload that file to the server. We also need to listen for upload progress events so we can report back to the user how much of the file has been uploaded so far.
The size attribute referenced in the following code examples is always an array of the form [width, height] in pixels.
    dialog.addEventListener('imageuploader.fileready', function (ev) {

        // Upload a file to the server
        var formData;
        var file = ev.detail().file;

        // Define functions to handle upload progress and completion
        xhrProgress = function (ev) {
            // Set the progress for the upload
            dialog.progress((ev.loaded / ev.total) * 100);
        }

        xhrComplete = function (ev) {
            var response;

            // Check the request is complete
            if (ev.target.readyState != 4) {
                return;
            }

            // Clear the request
            xhr = null
            xhrProgress = null
            xhrComplete = null

            // Handle the result of the upload
            if (parseInt(ev.target.status) == 200) {
                // Unpack the response (from JSON)
                response = JSON.parse(ev.target.responseText);

                // Store the image details
                image = {
                    size: response.size,
                    url: response.url
                    };

                // Populate the dialog
                dialog.populate(image.url, image.size);

            } else {
                // The request failed, notify the user
                new ContentTools.FlashUI('no');
            }
        }

        // Set the dialog state to uploading and reset the progress bar to 0
        dialog.state('uploading');
        dialog.progress(0);

        // Build the form data to post to the server
        formData = new FormData();
        formData.append('image', file);

        // Make the request
        xhr = new XMLHttpRequest();
        xhr.upload.addEventListener('progress', xhrProgress);
        xhr.addEventListener('readystatechange', xhrComplete);
        xhr.open('POST', '/upload-image', true);
        xhr.send(formData);
    });
If the user requests that the image is rotated, a request is sent to the server to action this and the response is used to update our image value and dialog.
function rotateImage(direction) {
// Request a rotated version of the image from the server
var formData;
// Define a function to handle the request completion
xhrComplete = function (ev) {
var response;
// Check the request is complete
if (ev.target.readyState != 4) {
return;
}
// Clear the request
xhr = null
xhrComplete = null
// Free the dialog from its busy state
dialog.busy(false);
// Handle the result of the rotation
if (parseInt(ev.target.status) == 200) {
// Unpack the response (from JSON)
response = JSON.parse(ev.target.responseText);
// Store the image details (use fake param to force refresh)
image = {
size: response.size,
url: response.url + '?_ignore=' + Date.now()
};
// Populate the dialog
dialog.populate(image.url, image.size);
} else {
// The request failed, notify the user
new ContentTools.FlashUI('no');
}
}
// Set the dialog to busy while the rotate is performed
dialog.busy(true);
// Build the form data to post to the server
formData = new FormData();
formData.append('url', image.url);
formData.append('direction', direction);
// Make the request
xhr = new XMLHttpRequest();
xhr.addEventListener('readystatechange', xhrComplete);
xhr.open('POST', '/rotate-image', true);
xhr.send(formData);
}
dialog.addEventListener('imageuploader.rotateccw', function () {
rotateImage('CCW');
});
dialog.addEventListener('imageuploader.rotatecw', function () {
rotateImage('CW');
});Once the user is happy with their image (and optionally the crop marks they've placed), they click the Insert button which will trigger the imageUploader.save event. This is not the same as the dialog's standard save event which is triggered by our event handler once we have the page variation image details back from the server.
The cropRegion is specified as a list of normalized values: top, left, bottom, right (e.g [0, 0, 1, 1] is the full image).
    dialog.addEventListener('imageuploader.save', function () {
        var crop, cropRegion, formData;

        // Define a function to handle the request completion
        xhrComplete = function (ev) {
            // Check the request is complete
            if (ev.target.readyState !== 4) {
                return;
            }

            // Clear the request
            xhr = null
            xhrComplete = null

            // Free the dialog from its busy state
            dialog.busy(false);

            // Handle the result of the rotation
            if (parseInt(ev.target.status) === 200) {
                // Unpack the response (from JSON)
                var response = JSON.parse(ev.target.responseText);

                // Trigger the save event against the dialog with details of the
                // image to be inserted.
                dialog.save(
                    response.url,
                    response.size,
                    {
                        'alt': response.alt,
                        'data-ce-max-width': response.size[0]
                    });

            } else {
                // The request failed, notify the user
                new ContentTools.FlashUI('no');
            }
        }

        // Set the dialog to busy while the rotate is performed
        dialog.busy(true);

        // Build the form data to post to the server
        formData = new FormData();
        formData.append('url', image.url);

        // Set the width of the image when it's inserted, this is a default
        // the user will be able to resize the image afterwards.
        formData.append('width', 600);

        // Check if a crop region has been defined by the user
        if (dialog.cropRegion()) {
            formData.append('crop', dialog.cropRegion());
        }

        // Make the request
        xhr = new XMLHttpRequest();
        xhr.addEventListener('readystatechange', xhrComplete);
        xhr.open('POST', '/insert-image', true);
        xhr.send(formData);
    });
Finally we need to tell the editor to use our image uploader, this is done by updating the ContentTools IMAGE_UPLOADER setting like so:
ContentTools.IMAGE_UPLOADER = imageUploader;After the user has uploaded an image we need to be able to pass the /rotate-image and /insert-image a reference so they know what image to work on. In our blueprint we're using the draft image URL and assuming that it can be used to find the original image, however if that's not possible then a unique Id for the image could be returned as well as the URL and size. In this case the Id would be stored along with URL and size in the image object and requests to the server would pass the Id value instead of the URL.
We only send a width when requesting an image to insert. We assume that the image's aspect ratio is locked during the resize and therefore only a width is required.
Resizing images
Once the user inserts an image into the page they will likely place it somewhere else within the content and resize it to be more aesthetically pleasing. The ContentEdit code takes care of implementing this function in the browser but the server is responsible for physically updating the size of the page image variation.
This is why we kept an original version of the image and why the maximum width the image could be resized to the width of the original (using data-ce-max-width). Images can't be scaled up, well not without causing artefacts, and therefore the page image variation is always resized using a copy of the original image.
The Image element will trigger a taint event whenever it's changed, including when resized, so we could listen for this event against the ContentEdit.Root and send a request to the server to perform the resize. But pesky users will probably make quite a few adjustments to the size to get it just right. Image processing is a CPU intensive task and so I prefer to request the change in size when the user saves the page. This also has the advantage that if the user cancels their changes we don't have to rescind any resize requests made to the server while they've been editing.
The only real downside to resizing images on save is that the browser has to present a scaled version of the image while editing which can lead to a somewhat blurry appearance. In my experience however the effect is small and acceptable for the purposes of editing.
How do we know which images to resize when the page is saved? Well the approach I recommend is to split the work between client and server. On the client-side we'll collect a list of image URLs/Ids and widths. On the server-side we'll check to see if each image has changed size by comparing the width received from the client with that of the existing page image variation.
There's another advantage to this approach which will become more apparent later when we discuss temporary images.
The following code implements a save handler for the ContentTools.Editor that provides information about the images in the editable regions of the page and their sizes:
If you're not familiar with how content is saved this would be a good point to check out the Saving strategies tutorial.
function getImages() {
// Return an object containing image URLs and widths for all regions
var descendants, i, images;
images = {};
for (name in editor.regions()) {
// Search each region for images
descendants = editor.regions()[name].descendants();
for (i = 0; i < descendants.length; i++) {
// Filter out elements that are not images
if (descendants[i].type() !== 'Image') {
continue;
}
images[descendants[i].attr('src')] = descendants[i].size()[0];
}
}
return images;
}
editor.addEventListener('save', function (ev) {
var regions = ev.detail().regions;
// Collect the contents of each region into a FormData instance
payload = new FormData();
payload.append('page', window.location.pathname);
payload.append('images', JSON.stringify(getImages()));
payload.append('regions', JSON.stringify(regions));
// Send the updated content to the server to be saved
function onStateChange(ev) {
// Check if the request is finished
if (ev.target.readyState == 4) {
editor.busy(false);
if (status == '200') {
// Save was successful, notify the user with a flash
new ContentTools.FlashUI('ok');
} else {
// Save failed, notify the user with a flash
new ContentTools.FlashUI('no');
}
}
};
xhr = new XMLHttpRequest();
xhr.addEventListener('readystatechange', onStateChange);
xhr.open('POST', '/x/save-page');
xhr.send(payload);
});
Temporary images
By now you might have noticed that as our approach stands there's the potential for a user to generate orphaned images (awwww). These are images uploaded but which for some reason don't belong to a page, for example the user deleted an image they uploaded, cancelled their changes, closed their browser, had a power cut, etc.
We could cater for the first two scenarios by adding code to listen for these events but we can't catch and handle all the others - here's where temporary images come in. A temporary image is just like any other image but we mark it in some way as temporary, for example it might be stored in a tmp/ folder or flagged in a database table. Temporary images have a limited lifespan; once uploaded, unless the image is subsequently marked as not being temporary, it will be removed after a given period of time.
I tend to give temporary images a lifespan of 24 hours and limit the number each user can upload to 100. A cron job is run every hour to check and remove temporary images past their lifespan.
Any image uploaded during the editing process is considered temporary until the user saves their changes, at which point those images should be made permanent. The save event handler from the previous section Resizing images comes in handy now as each URL in the images parameter sent with the request can be converted to a permanent image in the server-side handler (if not already).
Removing images
The final task we're going to cover is what to do when a user removes a previously saved image. There are two approaches I recommend here:
- Don't remove the images If you're going to allow users to revert to historic versions of the page, then you will need to keep any previously saved images so that they can be reinstated.
- Perform a search for the images when saving and remove any you can't find The existing image URLs in the page are compared with those sent as part of the save request. The list of images to remove can be created client-side or server-side but I'd recommend server-side as it's simple to do and doesn't require an additional parameter (for example imagesToRemove) to be sent.
To perform the search server-side, loop through each URL in the image parameter sent with the request and search for it within the existing HTML. If the URL cannot be found the image should be deleted.
If you're using an Id other than the image's URL then you can either:
-
add a data attribute to the HTML when inserting the image, for example
<img data-id="123" .../>, - or presumably it's possible to generate the image's URL from the Id, in which case after generating the URL you can search for it.
Final thoughts
Whilst I've done my best to make supporting images sound like a royal pain in the behind, it's all too often a crucial feature for users and they matter the most - so suck it up.
Alternatively you can checkout the Image uploads with Cloudinary tutorial which (with a few caveats) makes the process almost effortless.