Cloudinary to the rescue
If you've arrived here from the Handling image uploads tutorial then congratulations on making it this far and now don't be mad but there was an easier alternative all along - Cloudinary.
Cloudinary is a software–as-a-service (SaaS) solution for image management hosted in the cloud.
To be clear I've picked Cloudinary here because it was recommended to me by a friend, there are other image management services out there; Uploadcare was another I stumbled upon that looked promising.
Setting up your Cloudinary account
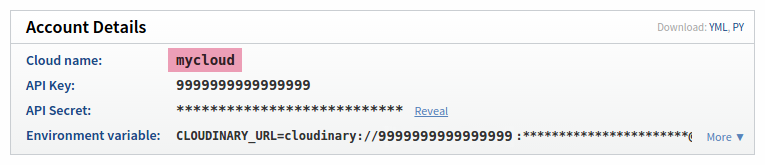
If you don't have a Cloudinary account already then register one (it's free for the base tier and only takes a few seconds). Once you have an account log into the site to access the console. On the console's dashboard in the Account Details section you'll see your Cloud name - make a note of it as we'll need it later.
We also need to configure our account to accept unsigned uploads, this is what allows us to off-load all of the server-side image handling to Cloudinary. Select the Settings link within the console navigation then select the Upload tab. Scroll to the bottom of the page and locate the section labelled Upload presets. If unsigned uploading is not enabled click the Enable unsigned uploading link to enable it.

Your account may already have an upload preset defined. If so click the Edit option next to it, if not select the Add upload preset link. There are a lot of options on the next screen but we're only interested in the first 2; the Preset name and Mode.
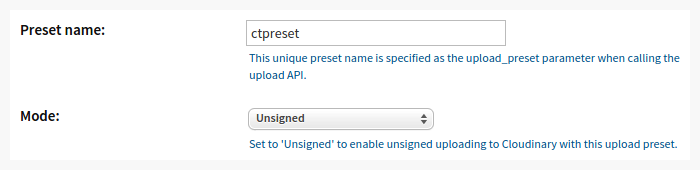
The Preset name will by default be assigned a unique code, you can leave this as is or rename it to something more memorable, either way make a note of it as we'll need it later. By default the Mode will be set as Signed, change this to Unsigned and then save your changes.
That's it as far as configuring Cloudinary goes, next we need to configure our editor to talk to Cloudinary's API.
This post from Cloudinary offers some details on the signed vs. unsigned upload approaches and the restrictions applied to unsigned uploads.
Building an image uploader for Cloudinary
In this section we're going to put together an image uploader for the Cloudinary API. If you're not familar with the basics of setting up an image uploader then I recommend you read the first couple of sections of the Handling image uploads tutorial (stop when you get to the code examples).
Cloudinary provides API libraries for a number of popular languages including a JQuery plugin for JavaScript, but in the spirit of ContentTools we'll avoid using any specific framework and write our own set of functions to handle calling Cloudinary's (REST) API from the browser.
There's quite a bit of code ahead so if you prefer to learn using rather than reading you'll find all the code in the sandbox folder of the repo. The image uploader code is in the file named cloudinary-image-uploader.coffee and at the top of the sandbox.coffee file you'll find instructions on how to set the sandbox demo up to use Cloudinary.
Before we can get to the good stuff (it's a relative term), we first need to define some settings for the Cloudinary API and a function to act as our image uploader. Use the cloud and upload preset names you set up in the Cloudinary console in place of mycloud and ctpreset in the code below:
// Define settings for the uploader
var CLOUDINARY_PRESET_NAME = 'ctpreset';
var CLOUDINARY_RETRIEVE_URL = 'http://res.cloudinary.com/mycloud/image/upload';
var CLOUDINARY_UPLOAD_URL = 'https://api.cloudinary.com/v1_1/mycloud/image/upload';

// Define the image uploader
function cloudinaryImageUploader(dialog) {
     var image, xhr, xhrComplete, xhrProgress;

    // Set up the event handlers
    dialog.addEventListener('imageuploader.cancelupload', function () {
        // Cancel the current upload

        // Stop the upload
        if (xhr) {
            xhr.upload.removeEventListener('progress', xhrProgress);
            xhr.removeEventListener('readystatechange', xhrComplete);
            xhr.abort();
        }

        // Set the dialog to empty
        dialog.state('empty');
    });

    dialog.addEventListener('imageuploader.clear', function () {
        // Clear the current image
        dialog.clear();
        image = null;
    });

    ...
}
You'll notice we've defined functions to handle the cancelUpload and clear events. These aren't affected by the integration with Cloudinary but to avoid any confusion:
- cancelUpload handles a user cancelling their file upload.
- clear handles a user clearing an uploaded image from the dialog.
Cloudinary URLs
When you upload an image to Cloudinary a URL is returned that can be used both to retrieve the uploaded image and also to transform it. Transforming the image requires the URL's path to be modified to include the details of each transformation to be applied. For example:
http://res.cloudinary.com/mycloud/image/upload/w_200,h_100,c_fit/sample.jpg
Here the image will be resized to fit within a rectangle 200 pixels wide and 100 high. If we also wanted to rotate the image by 90 degrees we'd modify the URL like so:
http://res.cloudinary.com/mycloud/image/upload/a_90/w_200,h_100,c_fit/sample.jpg
We'll be using the rotate, crop and fit transformations and so we need a way to parse Cloudinary URLs and build new ones. Add the following code after the cloudinaryImageUploader function (not inside it):
function buildCloudinaryURL(filename, transforms) {
    // Build a Cloudinary URL from a filename and the list of transforms
    // supplied. Transforms should be specified as objects (e.g {a: 90} becomes
    // 'a_90').
    var i, name, transform, transformArgs, transformPaths, urlParts;

    // Convert the transforms to paths
    transformPaths = [];
    for  (i = 0; i < transforms.length; i++) {
        transform = transforms[i];

        // Convert each of the object properties to a transform argument
        transformArgs = [];
        for (name in transform) {
            if (transform.hasOwnProperty(name)) {
                transformArgs.push(name + '_' + transform[name]);
            }
        }

        transformPaths.push(transformArgs.join(','));
    }

    // Build the URL
    urlParts = [CLOUDINARY_RETRIEVE_URL];
    if (transformPaths.length > 0) {
        urlParts.push(transformPaths.join('/'));
    }
    urlParts.push(filename);

    return urlParts.join('/');
}

function parseCloudinaryURL(url) {
    // Parse a Cloudinary URL and return the filename and list of transforms
    var filename, i, j, transform, transformArgs, transforms, urlParts;

    // Strip the URL down to just the transforms, version (optional) and
    // filename.
    url = url.replace(CLOUDINARY_RETRIEVE_URL, '');

    // Split the remaining path into parts
    urlParts = url.split('/');

    // The path starts with a '/' so the first part will be empty and can be
    // discarded.
    urlParts.shift();

    // Extract the filename
    filename = urlParts.pop();

    // Strip any version number from the URL
    if (urlParts.length > 0 && urlParts[urlParts.length - 1].match(/v\d+/)) {
        urlParts.pop();
    }

    // Convert the remaining parts into transforms (e.g `w_90,h_90,c_fit >
    // {w: 90, h: 90, c: 'fit'}`).
    transforms = [];
    for (i = 0; i < urlParts.length; i++) {
        transformArgs = urlParts[i].split(',');
        transform = {};
        for (j = 0; j < transformArgs.length; j++) {
            transform[transformArgs[j].split('_')[0]] =
                transformArgs[j].split('_')[1];
        }
        transforms.push(transform);
    }

    return [filename, transforms];
}
Cloudinary transformations are not limited to the few we're using here, for more information on what's possible read the Cloudinary documentation.
Uploading an image
Uploading to Cloudinary is no different than uploading to your own web server except we need to pass the name of our upload preset when POSTing so that the service knows to accept unsigned requests. The following code should go inside the cloudinaryImageUploader function:
    dialog.addEventListener('imageuploader.fileready', function (ev) {
        // Upload a file to Cloudinary
        var formData;
        var file = ev.detail().file;

        // Define functions to handle upload progress and completion
        function xhrProgress(ev) {
            // Set the progress for the upload
            dialog.progress((ev.loaded / ev.total) * 100);
        }

        function xhrComplete(ev) {
            var response;

            // Check the request is complete
            if (ev.target.readyState != 4) {
                return;
            }

            // Clear the request
            xhr = null
            xhrProgress = null
            xhrComplete = null

            // Handle the result of the upload
            if (parseInt(ev.target.status) == 200) {
                // Unpack the response (from JSON)
                response = JSON.parse(ev.target.responseText);

                // Store the image details
                image = {
                    angle: 0,
                    height: parseInt(response.height),
                    maxWidth: parseInt(response.width),
                    width: parseInt(response.width)
                    };

                // Apply a draft size to the image for editing
                image.filename = parseCloudinaryURL(response.url)[0];
                image.url = buildCloudinaryURL(
                    image.filename,
                    [{c: 'fit', h: 600, w: 600}]
                    );

                // Populate the dialog
                dialog.populate(image.url, [image.width, image.height]);

            } else {
                // The request failed, notify the user
                new ContentTools.FlashUI('no');
            }
        }

        // Set the dialog state to uploading and reset the progress bar to 0
        dialog.state('uploading');
        dialog.progress(0);

        // Build the form data to post to the server
        formData = new FormData();
        formData.append('file', file);
        formData.append('upload_preset', CLOUDINARY_PRESET_NAME);

        // Make the request
        xhr = new XMLHttpRequest();
        xhr.upload.addEventListener('progress', xhrProgress);
        xhr.addEventListener('readystatechange', xhrComplete);
        xhr.open('POST', CLOUDINARY_UPLOAD_URL, true);
        xhr.send(formData);
    });
If you were paying close attention you might have noticed that we're applying a transform to the image as soon as we get its URL back from Cloudinary. The transform applied resizes the image to make sure it fits within a 600 pixel square, that way if the user uploads a larger image we'll still only load a smaller version for the dialog - which is more efficient.
Rotating images
To rotate an image all we need to do is change our image URL to include a rotate transformation and Cloudinary will do the rest:
    function rotate(angle) {
        // Handle a request by the user to rotate the image
        var height, transforms, width;

        // Update the angle of the image
        image.angle += angle;

        // Stay within 0-360 degree range
        if (image.angle < 0) {
            image.angle += 360;
        } else if (image.angle > 270) {
            image.angle -= 360;
        }

        // Rotate the image's dimensions
        width = image.width;
        height = image.height;
        image.width = height;
        image.height = width;
        image.maxWidth = width;

        // Build the transform to rotate the image
        transforms = [{c: 'fit', h: 600, w: 600}];
        if (image.angle > 0) {
            transforms.unshift({a: image.angle});
        }

        // Build a URL for the transformed image
        image.url = buildCloudinaryURL(image.filename, transforms);

        // Update the image in the dialog
        dialog.populate(image.url, [image.width, image.height]);
    }

    dialog.addEventListener(
        'imageuploader.rotateccw',
        function () { rotate(-90); }
        );
    dialog.addEventListener(
        'imageUploader.rotatecw',
        function () { rotate(90); }
        );
Saving an image
Once the user is ready to insert the image we need to apply any crop they've defined (again by changing our image URL) and call save against the dialog:
    dialog.addEventListener('imageuploader.save', function () {
        // Handle a user saving an image
        var cropRegion, cropTransform, imageAttrs, ratio, transforms;

        // Build a list of transforms
        transforms = [];

        // Angle
        if (image.angle != 0) {
            transforms.push({a: image.angle});
        }

        // Crop
        cropRegion = dialog.cropRegion();
        if (cropRegion.toString() != [0, 0, 1, 1].toString()) {
            cropTransform = {
                c: 'crop',
                x: parseInt(image.width * cropRegion[1]),
                y: parseInt(image.height * cropRegion[0]),
                w: parseInt(image.width * (cropRegion[3] - cropRegion[1])),
                h: parseInt(image.height * (cropRegion[2] - cropRegion[0]))
                };
            transforms.push(cropTransform);

            // Update the image size based on the crop
            image.width = cropTransform.w;
            image.height = cropTransform.h;
            image.maxWidth = cropTransform.w;
        }

        // Resize (the image is inserted in the page at a default size)
        if (image.width > 400 || image.height > 400) {
            transforms.push({c: 'fit', w: 400, h: 400});

            // Update the size of the image in-line with the resize
            ratio = Math.min(400 / image.width, 400 / image.height);
            image.width *= ratio;
            image.height *= ratio;
        }

        // Build a URL for the image we'll insert
        image.url = buildCloudinaryURL(image.filename, transforms);

        // Build attributes for the image
        imageAttrs = {'alt': '', 'data-ce-max-width': image.maxWidth};

        // Save/insert the image
        dialog.save(image.url, [image.width, image.height]);
    });
Resizing images
Now that we can insert an image into the page we need to handle what happens when a user resizes it. This isn't part of the image uploader's responsibility (though for the sake of simplicity we'll tag it on the end of our image uploader file for now). The responsibility instead falls to the ContentEdit.Root node, we need to capture any image resize event and update the image's src URL to match its new size:
// Capture image resize events and update the Cloudinary URL
ContentEdit.Root.get().bind('taint', function (element) {
var args, filename, newSize, transforms, url;
// Check the element tainted is an image
if (element.type() != 'Image') {
return;
}
// Parse the existing URL
args = parseCloudinaryURL(element.attr('src'));
filename = args[0];
transforms = args[1];
// If no filename is found then exit (not a Cloudinary image)
if (!filename) {
return;
}
// Remove any existing resize transform
if (transforms.length > 0 &&
transforms[transforms.length -1]['c'] == 'fill') {
transforms.pop();
}
// Change the resize transform for the element
transforms.push({c: 'fill', w: element.size()[0], h: element.size()[1]});
url = buildCloudinaryURL(filename, transforms);
if (url != element.attr('src')) {
element.attr('src', url);
}
});
The resize event handling doesn't request a resized version of the image from Cloudinary until the user applies their changes, instead the browser will simply scale the original image. This may lead to the image appearing to lose quality when scaled up (only whilst editing) but crucially we don't request unnecessary transformations from Cloudinary.
Limitations
It's all too good to be true, well sort of. There are some limitations to what you can do with unsigned requests and URL changes. Of chief concern to us are:
- Images and image variations cannot be removed using an unsigned request.
- Allowing unsigned uploads also means allowing unauthorised uploads to your Cloudinary account.
So using Cloudinary as a service to simplify image uploads and transformations is awesome but in most cases you'll want to use signed uploads and support image removal via a URL on your server (manually removing them from the Cloudinary console is just less fun). Even so server-side integration is not complex and Cloudinary provide a number of guides for popular frameworks.